
Injecting your personality into your van build is one of the parts I enjoy the most. For me that really started when I put down the flooring.

CHOOSING WHAT TYPE OF FLOOR
First I considered insulating the floor. I found that the existing ply board that was fitted to my van was properly glued down and would be a nightmare to remove. Some people make fake floors to allow for additional insulation or storage. I decided that a decent thickness ply as well as decorative flooring would hopefully be enough – particularly as I have really good insulation in the walls. (I was correct!)
Then I had to decide what type of flooring to use. I considered traditional van carpet, lino, vinyl, luxury vinyl planks and laminate. I discounted laminate due to the weight of the wood. Van carpet and lino have a massive following, my parents have lino carpet in all of their vans and it is super easy to clean and warm underfoot.
For me, I like the wood floor look and that left me with vinyl or luxury vinyl planks. After looking around I decided on luxury vinyl click planks due to their aesthetics.
HOW TO INSTALL LUXURY VINYL CLICK VINYL PLANKS
Luxury vinyl click planks are super easy to insert. Mine came from B&Q and had a tongue and groove “click into place” system that ran along each board edge.

You simply lay a board down, then get your second board, run it alongside the first at a slight angle and then click into place.
HOW TO CUT
I found the easiest way to cut a straight line was to lay the plank onto a bit of ply on the floor (right way up). Use a metal ruler and strong Stanley knife to score the floor board as deep as possible (you probably won’t get very very deep). Then use your hands to fold the floor board away from the scored line. this will effectively “snap” the floor boards with a nice clean line. (Luxury vinyl plank floor boards only!)
What if you need a curve? In a van you will probably need a curve at some point!
I tried the knife. I tried a pair of strong scissors. Not good.
I had the best success with a small hacksaw. First I’d make sure I had the right curve by creating a paper (or cardboard) template. Then I would mark where I needed the curve to be on the floorboard with pencil. Clamped it to my workbench and used the saw to cut. Worked a treat.
LAYING THE FLOOR OUT
Because I have never laid this type of floor before, I took the route of cutting and laying out the whole floor. Then taking it up section by section and re-laying using a high temperature spray glue for permanency.
I cannot stress that the first line is the most important. When using plank floorboards, you need to get it straight, otherwise once you’ve laid down the whole floor it will be obvious that the boards are tilting on a diagonal. I’m sure there are lots of professional ways to do this, but I managed this by carefully creating a template in paper for the edges and then trimming the floorboards to fit.
This is what I did step-by-step:
Measure the distance between the two walls that you’ll be laying the floorboard along. Measure in a number of places so you can see if the distance is consistent (if so, great you’re walls are straight start laying!)
In a van, a straight wall is unlikely! One I’d made my measurements I could determine how much the distance between my walls varied. Lay a line of planks alongside one wall and one along the opposite wall (or you could use tape as a marker).
Measure the distance between the two lines of planks and make sure it is the same. Then measure the gap between each line of planks and the walls, make sure they match.

Now you have two straight lines to lay board between.
For the edges, lay a bit of card or paper along the straight line and fold it into the shape of the van.
Remove the paper, mark with a pen and cut to shape. Now you have a template to work to for the edge plank pieces.
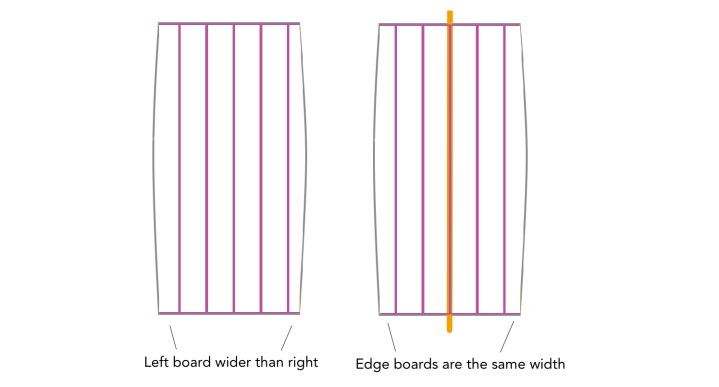
NOTE: Before cutting the edge planks, I think it is worth roughly laying out a fair bit of the floor from the central point (or just measure). This way you can see how many planks you need to fill the width (space between the two walls). Then rather than having a full board on one side and a partial board on the other you can cut an even amount off the two edges, creating a much more professional look.
PERMANENTLY PLACE THE FLOORING
Once you have your planks laid, peel up a section and then replace them after gluing the underside with a high temperature spry glue. Remember if you are using the click-in-place laminate planking you need to make sure you start with a plank which lays with the groove facing upwards so the next piece can be fitter.

Great work buddy, I’ll be following you journey
LikeLike
Thanks! I really appreciate that – and glad you found this useful!
LikeLike